Saturday, October 6, 2012

A Witch, a Pumpkin and a Ghost Walk Into a Bar and Order a Bottle of Wine...

By Melody
Isn't this such a sad photo?  An empty bottly of wine can seem like such a bummer.  However...there is something you can do to turn that frown upside-down, and it will make the kids smile with this creative idea for Halloween decor.

Take those empty wine bottles, and paint them with some spray paint. 

 Draw some fun faces on each with a Sharpie marker, and you have yourself a pumpkin, a ghost, and a witch. 

Add some battery-operated lights, and you have a real neat decoration for the home at Halloween time.  I had everything already on hand for this project except for the lights.  Been drinking a lot of wine lately, so that gives me a good excuse for all those sad, empty wine bottles -- I NEED to drink wine for my Halloween decor...now I just need to think of more ghouls to create...

Thursday, October 4, 2012

The grocery challenge!


Review by Rachael:

Recently I sat down to try & find ways we can save money around our house. I reviewed the budget and the one big item was eating out. We have to cut back on that! It is so expensive and usually not healthy for us at all. This also got me thinking about our grocery bill. Our weekly budget is $75 for groceries for a family of four. (Family of six every other weekend).

I realized we always have food in the cupboards & meat in the freezer but yet complain that we have nothing to eat and that leads me to takeout or the grocery store in search of dinner. Why not eat what we already have?!

I have given myself the $200 grocery challenge! I will not allow myself to spend more than $200 this month on our groceries.

I sat down with two pieces of paper. One was for a grocery list and one was a list of what we can make for meals. Many times I was only missing one or two ingredients from a recipe, so that item went on the grocery list and I listed that meal on my meal planning sheet. Turns out with buying a few items and what we already have I can make us 16 meals! And good, hearty meals! Chili, spaghetti, roast, homemade soups, etc.

I took my list to Fareway last night and spent $107. It was hard for me to allow myself to spend that much at one time, but I was stocking up and it needed to be done. The only items I HAVE to have the rest of the month will be bread, milk and fresh produce. I have $93.00 left to make that work.

I will keep you posted with updates on my spending each week. Wish me luck!!!

Tuesday, October 2, 2012

The awesome ISU bar


Review by Lyndee:
Not to brag, but we’re feeling pretty good about the project we completed this weekend.  We definitely took this hunk of wood from junk to gem! It was our largest project to date and took a lot of time and creativity.  It also took a lot of love for this Hawkeye fan to make an awesome Iowa State bar for one of her favorite uncles.  Melody and John have a man cave in their shed that hasn’t been fully utilized the way they had planned the last few years.  We decided to change that.  Melody and I started with an old shelving unit.


We cleaned, sanded, primed and painted this bad boy down.


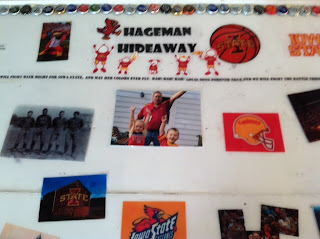
We painted and added coolers made out of flower boxes, a paper towel rack, upcycled drawers, storage, curtains, 176 beer bottle tops and made a mod podge collage on top that would make any grown ISU fan tear up a bit.  There are pictures of Cy, football, the ISU fight song, Coach Orr, the Mayor, Cael Sanderson, our favorite ISU basketball player of all time, Lisa Kriener, family photos and more.
This is our masterpiece from the front
These boxes will work as coolers for beer and pop

Back or bartender side of the bar

A close up of some of the great pictures we epoxy'd down
We will be putting out a video later of the step by step but we wanted to give you a sneak peek at what all our hard work turned into.  We think it turned out pretty well for under $100.  Also, it’s portable so it can be moved out of the man cave and onto the yard if it’s a patio party in the summer, but for now it will work perfect for football games and family gatherings in the corner under the new TV John bought.  We can’t wait to enjoy this space soon!

Monday, October 1, 2012

Tin can lanterns


Review by Rachael:
I found this empty, clean paint can and thought it would be a great to try to make a lantern.

We got a screwdriver, hammer and the can. We decided what design we wanted on the can and taped it on. 

In my head all we would have to do is to hit the screwdriver and the tin would split and give us the design. Not so much! It didn't work at all. The can dented and it took a lot effort to make a hole.  This is not a kid friendly project.  They did have fun hitting the can with a hammer until they broke it. I only allowed this since they were getting bored with the fail of the project. They seemed to have fun just hitting it...  

After my attempt failed I found this online, which is what we were trying to accomplish. Freezing them does make sense!! We may try this again in the near future.


Easiest healthy chicken chili ever

Review by Lyndee:
It’s that time of the year when I am looking for soups galore to keep me warm as the cold winter days rapidly approach.  I’m a big fan of chili and I like to add some variation from time to time. I will make it with ground beef, Italian sausage, ground turkey, turkey sausage, etc.  Last night I tried it with ground chicken.  It has about the same nutritional value as a 93% lean ground beef and it costs about half as much.  I got a pound at Fareway for $1.99!! I decided to keep this chili experiment very basic.  Not sure it can get much easier than this. It made a large batch (so I can eat it for lunch this week) and it's pretty healthy too.  

1 pound ground chicken
1 large jar diced tomatoes
1 regular can of chili beans
1 cup medium picante sauce or salsa

Brown the ground chicken in a pot. I used a little onion and minced garlic, salt and pepper while browning the chicken but that’s optional.  You could use the garlic and onion powder too if you didn’t have fresh on hand.  There wasn’t any grease to drain off of the meat which was great. Once browned I added the can of beans, the salsa and a jar of my grandma’s diced tomatoes.  Stir it up and let simmer for about 30 minutes until warmed through.  If you want it spicier you can add a few dashes of hot sauce, cayenne or chili powder.  Top with a slice of fat free American cheese or a dollop of greek yogurt and enjoy.  

Pickle wrap dip


Review by Lyndee:
I love pickle wraps! You know, those great little appetizers you find at food days where you have a bite size pickle piece wrapped in cream cheese and ham or chipped beef.  I do not, however, love making them. I don’t have the time or the patience to wrap each pickle spear, smear the cream cheese, wrap in meat and slice up without them completely falling apart.  So one of my go to party dips is pickle wrap dip.  It’s so easy and tastes great.  It’s always a huge hit.

6-8 ozs sliced ham
2 cream cheese blocks (I use reduced fat)
8 dill pickle spears
1 box club crackers

Pat pickles dry with a paper towel.  Cut into chunks and run through a food processor so they are itty bitty pieces that look almost like relish. Add to two blocks of room temperature cream cheese.  Dice up ham into little pieces.  Add to the pickles and cream cheese.  Mix well with a fork until there are no large chunks of cream cheese left.  Chill in refrigerator and serve with club crackers.

I love this dip because it’s yummy, easy to make and cheap.  It goes over well at parties, food days or tailgating so I never have to worry about having a bunch of leftovers.  You can always add more or less of the ham or pickles, depending on the flavor you like.

Peanut Butter Cheerios Bars


Cheerio bars
Review by Lyndee:

Ingredients:
6 cups Peanut Butter Cheerios 
2 Tablespoons butter
1/3 cup smooth peanut butter
10 ounces (approx. 40 ) regular sized marshmallows
1 cup chocolate chips


Prep a 9×13 pan with cooking spray or buttered parchment. In a pan over medium high heat melt the butter and peanut butter. Add in the marshmallows until you get a nice gooey mess. 

Add the Peanut Butter Cheerios and stir to combine making sure all of the cereal gets coated. Press into the prepped pan and while the cereal is still warm, sprinkle the chocolate chips on top so they melt slightly. Let cool and cut into squares. 

These bars were easy to make.  They cost about $4.50 because all I had to buy was the cereal and marshmallows.  Everything else, I had on hand.  They tasted pretty good. Not as ooey gooey as I would’ve liked.  Next time I would use ½ cup of peanut butter instead of 1/3.  I should’ve put the chocolate chips on quicker because they didn’t melt very well and then fell off sometimes when you would bite into the bars.  Emma and Jackson devoured these so they were definitely a hit overall. I was just hoping for a little bit more of the peanut butter flavor.