Wednesday, December 12, 2012

Deviled Egg Spread

Review by Lyndee:

1 dozen large eggs, hard boiled
2 tablespoons white vinegar (I didn’t use this)
1 cup mayonnaise
1 tablespoon yellow mustard
Salt & pepper
Paprika for dusting

Shell the eggs and halve them lengthwise. Coarsely chop half the egg whites and transfer them to a large bowl. Add the remaining white and all of the yolks to a food processor along with the mayo and mustard. Process until smooth. Scrape the mixture into a bowl and blend with the chopped egg whites. Season with salt and pepper. Can be made ahead and refrigerated overnight.

Ok, this was a near disaster and felt aptly named since it included the word devil.  I decided to kill two chickens with one stone and try doing my hard boiled eggs in the oven. I’ve seen this suggested numerous times on Pinterest and from other folks.  They say it’s the easiest way to make a hard boiled egg and that they peel much easier if you put them in a muffin tin and bake for 25-30 minutes.  I’m here to tell you that is a myth.  At least it was for me anyway.  When the buzzer went off and I took the eggs out I found that one had broken.  I felt like the eggs were a little hard or rubbery when I was chopping them up.  They did not peel at ALL!! It took me a good 15 minutes to chisel off the little bitty pieces of shell.  I wanted to chuck them against the wall but I’m not one to waste anything so I kept peeling while cursing under my breath. 

I don’t have a normal size food chopper and my mini one couldn’t do the job so I used my hand held mixer to blend this.  My black sweater looked like a hawkeye speckled yellow masterpiece by the time I was done.  I had stopped at the store specifically to get white vinegar because it’s listed in the ingredients.  And then when it came time to make these bad boys, there’s no vinegar in the directions. So I hopped online to see what I had missed by checking some other similar recipes.  There they suggest putting vinegar in the water to boil your eggs faster.  Ok, so I bought vinegar I didn’t need.  Stellar. 

Anyway, once I finally got the dang things peeled and chopped and mixed it was quite a process.  Next time I would boil my eggs like a normal person, probably still not use the vinegar and go about my merry way.  The dip is good in that it actually tastes like a yummy deviled egg.  I’m serving mine with club crackers.   

Seasoned pretzels

Review by Lyndee:

4 Bags (9 oz) of Petite Pretzels
1 bottle, Orville Reddenbacker Buttery Popcorn Oil
1 Pkg. Hidden Valley dry dressing mix
2 T. dill weed
1 tsp. Onion powder
1 tsp. Garlic powder

Stir oil, ranch mix, dill weed, and powders together.  

Place pretzels in a 2-gallon Ziploc bag. Pour oil mixture over pretzels.  Toss bag and turn bag over every-so-often.  P.S.  Don’t forget the mints for afterwards!!

After a close race on Facebook whether or not to make seasoned or spicy pretzels for food day at work, seasoned won! Thank you to Char and Molly Fairchild for the recipe.  These are awesome!! The kids taste tested them last night and there was oohing and ahhing and apparently they “rock”! Hopefully my co-workers agree.  If not, the kids will be happy if I bring home leftovers.  Which, there could be either way because this makes a huge batch!! I have two one-gallon bags full.  That should please the masses. And I can’t complain about all those snacks for about $5. 

Tuesday, December 11, 2012

Don't Eat That Cookie!

Salt dough ornaments have been made for years to decorate Christmas trees.  They are so cute, but do not eat them -- they'll make you pucker up faster than a dill pickle! However, the project is incredibly easy, and these cookies are hard to burn!  

Here's what you'll need:
   1 cup salt 
   2 cups all purpose flour     
   1 cup warm water 

Here's what you do:

Mix the above ingredients above until you have a "doughy" consistency.  Then, roll out like you would with sugar cookies, and use cookie cutters to create each ornament.  Remember to take a straw, and poke a hole through the top of the soon-to-be oranment, so that you can lace a string or hook for hanging.  

Then, you can let the ornaments air dry, which can take about 24 hours.  Or, you can do what I did, and BAKE them at 250 F for about two hours until dry.  However, the amount of time will depend on size and thickness.  
Once cooled, you can take acrylic paints and decorate each ornament.  The kids really enjoyed this process.  
Once the paint was dry, I placed a little Christmas message (created via my cricut) on each ornament, then modge-podged the whole cookie, and while the modge podge was still moist, I sprinkled on some glitter.


You can also use varnish or polyurethane to coat the ornament so that it is less likely to break and has a little shine.  But, I take the easy route and use what I have.  In my house, I have plenty of modge-podge, and the stuff worked great!

You'll see above, that Frosty was not painted.  So, you can skip the whole painting step and just have a plain, "no frosting" cookie if you'd like, too!

Have fun, and please share your creations!

Rumchata whipped mint dream

Review by Lyndee:
We just can't stop throwing Rumchata into our drinks and seeing what we come up with! Try this one for a whipped, minty, yummy goodness.

1 part rumchata
1 part whipped or cake vodka
1 part mint chocolate Bailey's

Shake over ice and then drink as a shot or drink. Dreamy.

Sweet & Spicy Wings

Review by Lyndee:

Ingredients
6 pounds chicken wings, separated at joints, tips discarded
1 1/2 cups Louisiana-style hot sauce
3/4 cup butter
1 cup honey
1 pinch garlic salt
1 pinch ground black pepper
1 teaspoon cayenne pepper, or to taste

Preheat an outdoor grill for high heat.  Lightly oil the grill grate. Grill the chicken 8 to 12 minutes on each side, or until juices run clear. (You can deep fry or bake the chicken instead if you want to, but we prefer it grilled.)

In a saucepan over medium heat, mix the hot sauce, butter, honey, garlic salt, black pepper and cayenne pepper. Simmer about 10 minutes, until blended and heated through. Pour the sauce over the grilled chicken wings and stir to coat. Serve immediately. 

These wings were awesome!! The flavor was so good you won’t even need ranch or blue cheese for dipping.  Sweet with a kick of spice and delicious.  They are messy so make sure you have some napkins handy.  I only did 2 pounds of wings and cut the recipe in 1/3.  I’m thinking a crockpot full of these will be served at the new years eve party, for sure! Next time I’m going to try boneless wings or drummies for a little less mess.  

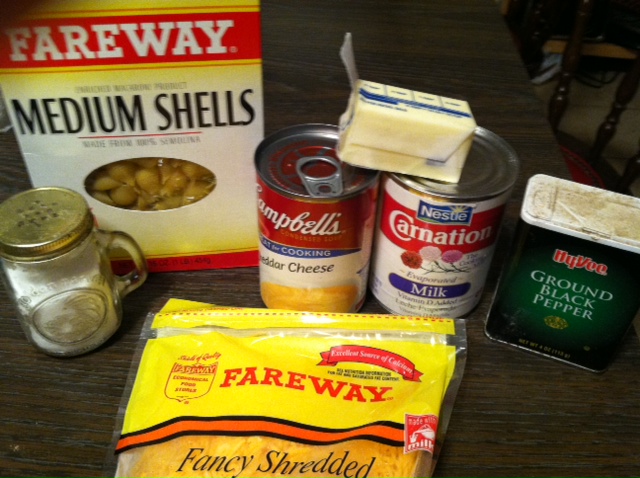
Easy Extra Creamy Mac & Cheese

Review by Lyndee:

Prep Time: 5 minutes  Cook Time: 15 minutes Total Time: 20-25 minutes

Ingredients:
1 16oz box pasta (shells, macaroni, bow tie)
4 tbsp butter
1 can cheddar cheese soup (10 3/4 oz)
1 can evaporated milk (12oz)
1-2 cups grated cheddar cheese
Salt & Pepper to taste (or seasoning salt)

Directions:
Cook and drain noodles.  Add back to warm pot, stir in butter and cheese soup.  Add half the can of evaporated milk.  Stir until combined.  Add 1 cup of shredded cheese to start with, add more until desired cheesiness.  Keep the burner on low to help melt things together.  If it gets too thick, add some reserve evaporated milk to thin it down.  Add salt and pepper to taste

This was great! Easy to make this warm comfort food on a cold Iowa night.  The kids loved it and had seconds.  I asked Mitchell if it was good and he said “No, it’s delicious!!!”.  It was creamy and awesome.  I used the shells and about 1 ½ cups of shredded cheese.  I used some seasoning salt as well.  Ended up using about ¾ of the evaporated milk but only because I rewarmed it for the boys when they got home from wrestling practice.  I paired it with some chicken nuggets for them and blackened tilapia for me.  This will definitely go in the rotation for meals. 

10-Minute Blackened Tilapia Recipe

Review by Lyndee:

Ingredients: 
Tilapia filets
Vegetable Oil
Blackening Powder Recipe

Blackening powder recipe:
1 Tbsp. smoked paprika
2 tsp. thyme
1 tsp. cumin
1 tsp. oregano
1 tsp. garlic powder
1 tsp. onion powder
1 tsp. salt
1/2 tsp. ground black pepper
1/2 tsp. ground red pepper

Mix dry ingredients together in a small bowl to create blackening powder. Then moisten the sides of each tilapia filet (either with water or cooking spray), and coat with blackening powder. (I generally use about 1 Tbsp. powder per filet.)

Heat 1 Tbsp. of oil per filet in a skillet over medium-high heat. Once oil is almost smoking, add filets and cook for about 3 minutes per side, or until fish is opaque and can be flaked with a fork. Remove from pan and serve immediately.

The verdict:
I didn’t want to fry my fish so I opted to bake it for 15 minutes at 400 degrees.  I think something got lost in translation here.  The fish was good but super spicy. I had to scrap off some of the seasoning and I'm a pretty big fan of spicy.  Maybe I needed more tilapia than the recipe called for?  The original recipe didn’t list size or pounds.  I think not frying it is what made the powdery seasoning so thick.  Had I fried it, some of that would’ve come off and been crispier.  Perhaps I could try broiling it?  Again, the flavor was good just a bit much in this manner.  On the bright side, it was cheap and super easy so I will probably try this again and either fry as directed or broil.