Thursday, January 31, 2013

Does Your Tired Dolly Need A Bed???

This Christmas, Emma asked for a doll bed.  No, not just any old doll bed, she was quite specific.  It had to be big enough to fit her biggest baby -- a big girl we call "Bubba".  She wanted it to be purple, with a purple pillow and blanket, with necklaces hanging from it.  What???  How the hell am I gonna find something like that at Target.  Good thing Santa's star elf of the year (i.e. Melody) has the skills and workmanship to whip up such a creation.  

Remember the dollhouse made out of drawers?  Well, I had another drawer of that size left, and that became the bulk of my doll bed.  
So, how did I go from this.....
to THIS??????
  1. First, I needed two garden stakes (see bed posts), I attached them to the front of the drawer with a screwgun.  I first sawed off the point part that you put in the ground so that it was square.  
  2. I took the old knob from two of the drawers, and attached it on top of each bedpost with wood glue. 
3. I took an old cupboard door, and upholstered it with some foam lining to create a cushion, and covered it with one of Emma's old baby blankets to make the mattress.

4. I attached the mattress with a hinge so that it could open and close for extra storage (i.e. doll clothes and accessories).  
5. Then, I painted the doll bed purple (as requested).

6. Once dry, I attached some cheap necklaces that I bought from WalMart (as requested), and I sewed a purple pillow (beginner sewers can definitely do this), and blanket to match.  All found from old scraps of fabric I had laying around.  

In the end, we had a nice bed for Emma's dollies to sleep.  Emma finds it so comfortable that, even she, can be found perched on top of the doll bed!  Here's a picture of Baby Snow getting ready for her nap.  And, just so you know, Baby Bubba fits this bed perfectly, too, and now sleeps very comfortably.

Tissue paper floweres


Review by Rachael:

What you'll need:
  • Pastel colored tissue paper
  • Pipe cleaner
  • Scissors
  • Ruler

How to make it:
  1. Cut tissue paper into rectangles of desired size.
  2. Stack around 15 pieces of tissue paper. Use the same color or different colors. If you want to use a smaller number of pieces of tissue paper, flower will not be as full.
  3. Accordion pleat the tissue paper working from the long side.
  4. Wind one end of the pipe cleaner around the middle of the accordion pleated tissue paper.  
  5. Trim the ends of each side to give the pedals a unique look. Trimming the ends into a point (like a triangle), or a bump (like a half circle) will look very pretty.
  6. Gently separate each layer pulling upwards toward the middle of the flower. Do the second side. Done.

I have all the items needed to make these around the house, so I thought this could be a fun to make for Valentine’s.

I took out white tissue paper as I have excess of it & wanted to see what I thought of the flowers before using my pretty colors. When I unfolded the tissue paper it already had seems of perfect rectangles so I cut along those lines and then stacked the pieces. (I used 16 pieces)  I followed the accordion pleat instructions and placed the pipe cleaner around the middle, leaving enough to make a stem. I decided to cut triangles at the end of my sides. Separating the tissue paper took the longest time, but wasn’t hard. You just lift it up and keep working with the paper to make the flower full. The only problem I had was getting the two sides to come together. I felt as if where the pipe cleaner was it kept separating and it looked bad. In the photo I am actually squeezing it together to look that good. This isn’t a hard project just not impressed with the end result. If the kids want to give it a try I would let them as it is easy & again I already have all the items needed. Next time I might make the rectangle a bit shorter. 


Quick and simple buttery garlic bread sticks

Review by Rachael:

Yield: 8 servings

Ingredients:
1/4 cup (1/2 stick) butter or margarine
1 tablespoon oil
3 cups flour (I use part whole wheat, part unbleached)
1 teaspoon salt
1 tablespoon baking powder
3/4-1 cup milk
1 + 1/2 teaspoon garlic powder
1 tablespoon parsley flakes 1/2 teaspoon salt


Instructions:
Preheat oven to 425 degrees. Place butter and oil in 9x13 pan and put in oven so butter melts as the oven heats up. Be careful not to let it burn!  Stir dry ingredients together (1 tsp of the garlic), and gradually add milk, stirring until dough forms and leaves sides of bowl. I don't bother to actually measure out the milk - just add it gradually until there's enough. Knead 5-6 times in bowl; place on floured countertop and roll out into 9x13-inch rectangle. Sprinkle 1/2 teaspoon garlic powder and 1/2 teaspoon salt in the melted butter before placing dough in the pan.  Lay dough in pre-heated 9x13-inch pan, atop the melted butter/oil.  Cut into 1/2" strips. Bake at 425 degrees for 20 minutes.  Breadsticks may be sprinkled with parmesan cheese before baking.

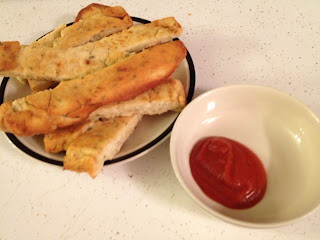
I followed these directions & they were easy to make. They smelled wonderful while they were baking.  When I took them out the tops looked kind of dry but the bottoms were golden brown from the butter. We dipped them in marinara sauce and… not great. Jake took one bite & was done. I finished mine but wasn’t impressed. They were dry on the outside and almost flat. I feel as if they would have risen a little more they would have been okay. Jason loved the seasoning but wasn’t sure about the texture. I think I may keep experimenting with this one and see if we can find a bread stick the whole family can enjoy. 

Strawberry Butterfly Cupcakes

My little Emma turned five this month, and the highlight of the day is to bring a treat to pass out to her fellow Rockets at pre-school.  Her and I scoured the internet for a cool cupcake to make for her and her fellow classmates, and we found this cute little butterfly cupcake idea via Martha Stewart's website. 
The exact recipe that Martha suggests can be found  on her website via: http://www.marthastewart.com/266904/butterfly-cupcakes
We made a few revisions to the recipe that included the difficult task of purchasing a box of cake mix and a tub of pink frosting from the local Hy-Vee grocery store.  This mom doesn't have time (nor do I want to) whip up my own frosting and batter.  Thank the good Lord for Ms. Betty Crocker and Mr. Pillsbury dough boy.  So, here's what we did...
  1. Bake up your cupcakes.  Emma chose a Strawberry cake mix.  
  2. Lick batter spoon clean.  (CHECK, CHECK, CHECKITY, CHECK, CHECK!!) 
3. When cool, frost your cupcakes with your choice of frosting.  Again, Emma chose Strawberry.

4.  Then, begin to create your butterfly.  We chose to make the body of the butterfly out of Valentine M&M's to match the pink theme Emma had going.  
5.  We lined about four m&m's to make the body of our butterfly.  
6. After your m&m's have been placed, you insert the pretzels for the wings.  ***TT123 TIP*** In reading the reviews on Martha's recipe, I found that a lot of people said that the pretzel wing would go stale if left setting out too long (i.e. more than a day).  They suggested coating the pretzels with chocolate or almond bark.  I thought I could make this even easier and effective by purchasing the already made ones (via Dollar General at $1 per bag).  Or, you could use those Flipz pretzels that you can find in any grocery store's candy aisle.  These worked perfectly for Emma's cupcakes because they were already pre-sprinkled with pink sprinkles.

To make the butterflies look like Martha's cupcakes you need to use a lot of frosting to hold the wings just right.  But, we wanted all the pre-schoolers to take naps that afternoon and not drive their teachers crazy, so we didn't use that much frosting.  So, we had to just slightly press the pretzel into the cupcake as well.

7.  Once your wings have been inserted, you're supposed to take black licorice strings and make antennas (see Martha's butterflies).  I thought that was what I bought, but I mistakenly bought the regular licorice, which would be a little too thick for our butterfly antennas. 
 So, we chose to let Jackie eat the licorice instead.  
8.  Emma reported that her Strawberry Butterfly cupcakes were a hit with her Rocket classmates...even if they had no antennas!  And, the very best part, the kids felt pretty good about themselves because this project they accomplished was easy enough for them to help, and they had fun doing it!

BBQ pulled pork

Review by Lyndee:

Ingredients:
1 pork roast (around 2 ½ pounds)
½ bottle of Sweet Baby Rays barbeque sauce
12 oz can of diet Pepsi
Lawry’s seasoning salt

Generously coat pork with Lawry's seasoning salt. Place in crock pot and pour in soda and barbecue sauce. Cover and cook on low for 4-5 hours. If you have a larger piece of meat, it will probably take longer. After 4 hours or so, take two forks and shred the meat into bite size chunks. Let it sit in the juice to soak up all the flavor. It can stay on warm in crock pot while serving, and can easily be reheated the next day. Serve on a kaiser roll and add more barbecue sauce if needed.

This was easy to make and smelled great in the crockpot all afternoon.  It tasted pretty good but for some reason, was really watery.  I used a larger roast so I added 16 ozs of diet Pepsi, which may have been my problem.  Added some sweet baby rays and ate these as sandwiches.  And it made a lot so we will have leftovers for lunches.  

Wednesday, January 30, 2013

Rumchata Cookie

So remember the delicious Rumchata Cupcakes we made a few weeks back?  Well, as the post stated, it made a LOT of frosting.  Of course, I can't waste anything because I'm part Hagebakke so after some thinking I came up with a brilliant idea...Rumchata Cookies!!  How do you make these little bites of heaven, you might be asking?  Um, it couldn't be easier.  It takes about 10 minutes.  If you have a favorite sugar cookie recipe, by all means, bust it out but I did the pouch by my buddy Betty Crocker.  Some butter and one egg later, we were on our way to sugar cookie high. I made these pretty small drop cookies.  A teaspoon size ball and they come out in great little silver dollar size.  I spread on the Rumchata frosting and it was like they were meant to be together all along.  Sweet, rich and so dang yummy.  Now, I need to go hide them so I don't eat them all.

Old Drawers to Dream Dollhouse

After a recent remodel in our house, we had no use for some drawers that once were inset into the wall.  So, they've been sitting out in our pole shed for some time just waiting for me to think up something interesting to do with them.  This past Christmas my daughter was asking for a Lalaloopsy House (the recent little girl craze).  Instead of spending the money at the retail store, I decided to pick up just a few items from the Menard's store and put the old drawers to use!  I used a smaller sized drawer about 2.5'x1' in size.  I used two drawers of this size.
First, I scoured the internet for inspiration to construct the "Lalaloopsy House", and here is where I found it: http://modpodgerocksblog.com/2011/04/make-drawer-dollhouse.html.  Here is a picture of this blogger's creation -- so super cute!  
I was super excited to get started, and here's the steps I took to make my own variation of the drawer dollhouse...
  1. Remove the track from each side of the drawer.
  2. Remove the knob.  
  3. With a jigsaw (see hubby's tool shed), I removed one inch from the top face board of the drawer so that it was flush with the drawer.  Unlike the inspiring picture, I wanted my dollhouse to open up (like a book), so I needed to make the two drawers flush when lined up together. 
  4. With a power sander, I sanded and then wiped clean each drawer to prep for painting.
  5. I painted one drawer pink, and the other purple.  The face of the drawers I painted blue.  
  6. Once dry, I placed two hinges on the back of the house so that it would open and close.
  7. On the front I placed a clasp to hold the house closed for ease in moving and keeping everything stored.  
  8. Then, the fun began...I used my handy dandy cricut to cut out windows, doors and picket fence to decorate the outside of the "Lalaloopsy House".  I attached them using modge podge, and then a clear spray paint over top of everything when the modge podge had dried.
  9. On the inside, I used scrapbook paper to make wallpaper and carpet and rugs.  I also used modge podge, and then once dry, I sprayed everything with a clear spraypaint.
  10. Then, I had to go to the store and purchase some of the MANY Laloopsy mini dolls for the dollhouse, and it was perfect because each doll came with her own little accessories that would help in furnishing the house.  I bought about five of the dolls which equaled less than it would have cost me to buy one big doll.  
  11. On Christmas morning, Emma LOVED it.  At her age she couldn't even tell that it was homemade, and she loved all the special touches (including her name on the inside of the house along the top of the roof. 


Honey-lime chicken skewers

Review by Lyndee:

Ingredients:
3 tablespoons soy sauce
2 tablespoons honey
1 tablespoon vegetable oil
juice of one lime
2 garlic cloves, minced
1-2 teaspoon Siracha
red pepper flakes, to taste
2 tablespoon cilantro
1 pound skinless, boneless chicken breasts


In a small bowl, combine your ingredients, through the cilantro. Mix thoroughly.  Pour marinade over chicken breasts and turn to coat. Cover and marinate for at least 1 hour. If you are using skewers, make sure to soak in water for at least 5 minutes.  I skipped the skewers since I was using an indoor grill and just did chunks o’chicken.  

Grill on medium high heat for 6 to 8 minutes per side, until juices run clear.

These were incredible!  Tender, juicy and sweet with a hint of spicy after taste.  Very easy to make and cheap too.  Loved this chicken and will definitely be making it again.  


Tuesday, January 29, 2013

strawberry sweet treat

Review by Lyndee:

What has 53 calories, less than a gram of fat and is a great way to satisfy your sweet tooth with zero prep?  Why yes, 1/2 a cup of strawberries and 2 tablespoons of fat free cool whip! This is a perfect after dinner snack that makes you feel like you're being naughty, but you're not.  If you like the consistency of thicker desserts, mix this up and put it in the freezer for a few hours.  I eat mine fresh from the fridge.  You could also try greek yogurt or cottage cheese if you're looking to up the protein, but that will add a few calories and fat.  Still a healthy and delicious snack either way though!

If you want to make it more like a pie, crumble up one graham cracker and stir it in for some crunch.  This works with blueberries and blackberries too.


Monday, January 28, 2013

Zuppa Toscana Soup (Healthified)

Review by Lyndee:

Ingredients:
1 lb. Italian sausage ground or links (I used Italian style lean ground turkey )
2 large russet baking potatoes , sliced in half, and then in 1/4 inch slices
1 large onion, chopped
1/4 c. bacon bit (optional)
2 garlic cloves, minced
2 c. kale or 2 c. swiss chard , chopped
16 oz. can chicken broth
1 quart water
1 c. heavy whipping cream (I used nonfat greek yogurt and ¼ cup skim milk)

Brown the sausage and slice up the potatoes.  Place cooked Italian sausage, chicken broth, water, garlic, potatoes and onion in slow cooker.  Cover and cook on High for 3-4 hours until potatoes are cooked and soft.  Turn the crock pot off and add the kale.  Return the lid and let sit for 5 minutes.  Add whipping cream and serve. 

The house smelled amazing while this was cooking! It looks just like the Olive Garden version and tasted just as great too!  I refused to use heavy whipping cream and I think the milk and greek yogurt was the perfect substitution.  Also, it made a large batch so we will get many meals out of it.  Why pay $5 for a bowl of this at Olive Garden with tons of fat and calories when you can make a huge bunch at home for the same price and a fraction of the fat and calories?  It doesn’t take a mathematician to know the smart choice here.  Add a dash of freshly grated parmesan cheese on top like they do at the restaurant and your family will never know the difference.  

Chocolate peanut butter puff corn...FAIL


Chocolate puff corn

Review by Lyndee:

Ingredients:
1 large bag of puff corn (butter flavored)
9 squares of chocolate almond bark
Peanut butter chips (optional)
Marshmallows (optional)

Melt almond bark, chips and marshmallows in the microwave (30 second intervals) and spread over puff corn.  Mix well. 

In my head this was going to be even better than the white chocolate puff corn. I mean, chocolate, peanut butter and marshmallows?  How could I go wrong?  Except it did go terribly wrong.  For whatever reason, I can never get chocolate almond bark to melt the same as white. I don’t know why but it’s a curse that follows me.  This experiment was no difference. It came out like liquid cement and dried in large clumps with the puff corn instead of a smooth, delicious coating.  The taste was ok if you got a clump of goodness but it looked like total crap and I’m counting this as a fail.  If anyone knows why the chocolate almond bark doesn’t want to melt for me as smoothly as the white, please let me know.  I’m at a loss.  

Saturday, January 26, 2013

Chicken Noodle Soup for the Sewer -- No Soul's Gonna Want This Crap!

It started like any other Saturday morning. It was cold outside and chicken noodle soup sounded delicious for lunch! I cooked up some chicken, and shredded it. Then, I cut up some celery and carrots and mixed It all up with a box of chicken broth and some water. THEN... I put uncooked egg noodles in the pot, and placed it all on warm in the slow cooker.

As I waited that morning until lunch, the house began to smell so enticing and my tummy began to growl.

When it came close to lunch time, I thought I'd go give it a stir. I gasped as I discovered the soup  became a paste! The noodles had disintegrated and when I tasted it, it tasted like someone had mixed flour and Elmer's glue into my soup. Needless to say, we did not eat it.  When a wooden spoon sticks straight up when stuck in the soup, THEN it is not soup!!!
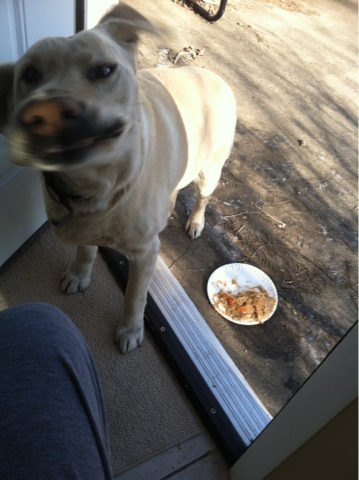
I tried to feed it to my dog, and he couldn't even eat the whole thing.
Here he is after having a taste.
 
He soon walked away with a look of disappointment.


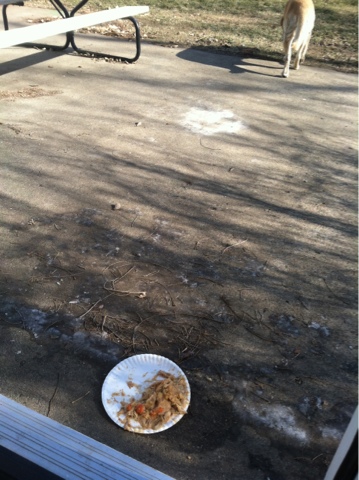
And, after that I couldn't get him to come any closer to my ultimate fail.

However, lesson learned...boil your noodles right before serving and then add them to the soup!