
Sunday, September 30, 2012
Happy birthday, Melody!!
It's been a week of extreme highs and lows here at TT123 but today we are excited to wish a very happy birthday to our own sweet, brilliant, loving and wonderful Melody! Hope you had super birthday!!
Thursday, September 27, 2012
Easy-Peasy Finger Painting Project
By Melody
The kids love to finger paint, but I despise getting those messy things out. It is usually quite the process, and they always want to do it once I've cleaned the kitchen or something. On Pinterest, I found an idea for a finger painting project that even I was curious to try, and it looked easy-peasy! So, I told both kids to strip down (which is the easier than adding to the laundry pile), and this painting project was actually pretty darn fun. This is what you'll need:
- Paper
- Painters Tape
- Finger Paint (or even crayons will suffice)
Tape off a design using the painters tape. We chose to do each of their first initials. Then, the kids paint over top of the tape and all around making any design they choose...
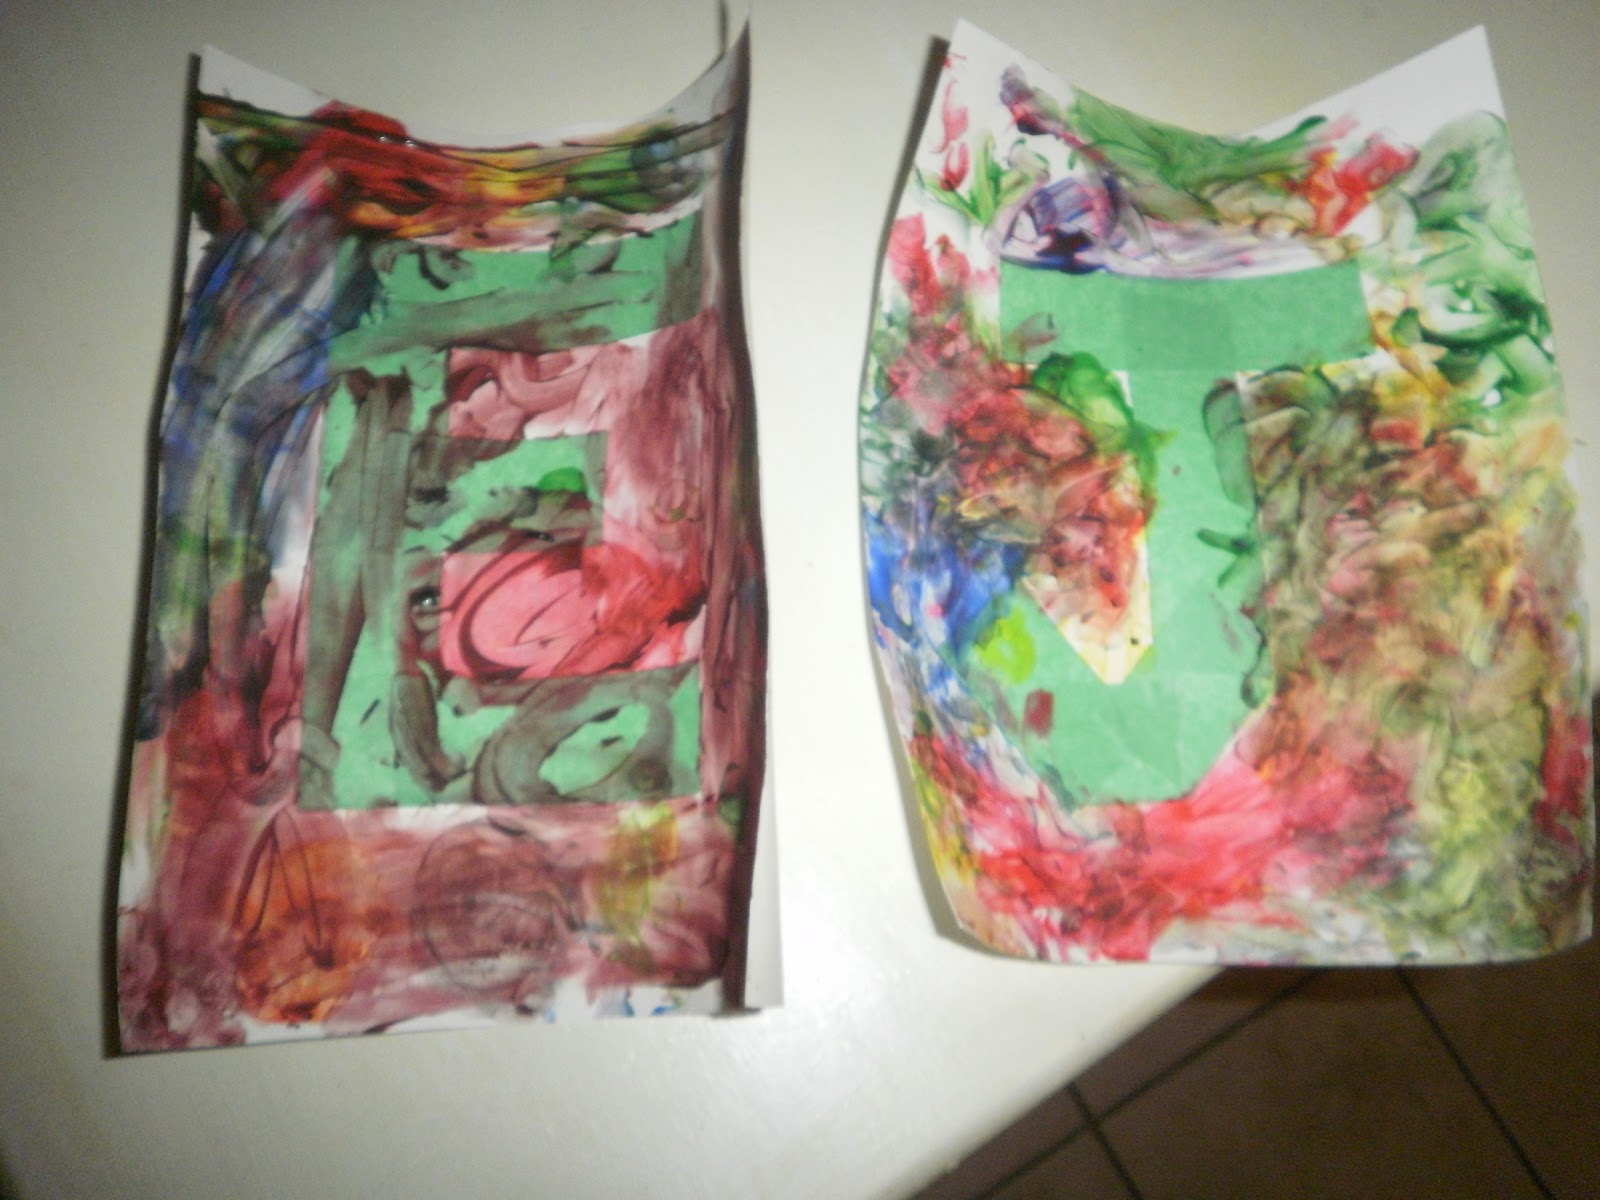
When the paint is dry, you remove the tape, and you have a nice design. I think I'm going to frame them and put them on each kids' bedroom doors. The kids really got a kick out of removing the tape and finding a very clean, white letter underneath their masterpieces. Emma thought it looked so nice, she commented that "It looks like a high schooler did it!" You know those high-schoolers...they really stay in the lines well when they paint and color!


The Perfect Popcorn Ball

I set out on a grand journey to create the perfect popcorn ball... yesterday! The kids have their last Wee Ball game of the Fall season tonight, and I am "up to bat" for providing treats for our little ball players. I searched the internet for the perfect recipe, and read up on all the modifications, tips, tricks, and what-not-to-do's. And, I'm proud to say I think I've nailed it. However, popcorn balls come in all variations, and BEWARE mine is a chewy, yet crunchy, and it is a sweet variation -- the perfect popcorn ball in my world. And, for the kids and hubby as well. Based on my testing and research, here's my TT123 "modified" recipe -- it will yield about 20 popcorn balls (and allows for taste testing along the way of loose gooey popcorn)...
Ingredients/Directions:
- 3/4 cup light corn syrup
- 1/4 cup butter (DO NOT USE MARGARINE!!!)
- 2 teaspoons cold water
- 2 1/2 cups sugar
- 1 cup small marshmallows (I used the multi-colored ones)
- 2 teaspoons vanilla (or other flavoring you'd like to "test")
- 5 quarts (roughly a little more than 20 cups) plain popped popcorn (Use the real air-popped popcorn if you can, otherwise revert to the microwaveable popcorn)
- In a saucepan over medium heat, combine the corn syrup, margarine, cold water, confectioners' sugar, vanilla and marshmallows. Heat and stir until the mixture comes to a boil. Carefully combine the hot mixture with the popcorn, coating each kernel.
- Grease hands with some PAM spray and quickly shape the coated popcorn into balls before it cools. Wrap with cellophane or plastic wrap and store at room temperature.
Now for some TT123 tips/tricks for creating the Perfect Popcorn Ball:
- A quick way to make balls is to oil a cup (I used a measuring cup). Stuff coated popcorn in. A tap to the bottom of the cup onto waxed paper leaves perfectly-proportioned balls! Just form them into more of a circle (the kids were good at this part), wrapped them with cellophane, and placed a little Halloween sticker on each one.
- For a little extra sweetness, I modified the original recipe by adding 2 teaspoons of vanilla. Yum!
- Make sure to grease up those hands -- these suckers are sticky!
- Instead of using microwaveable popcorn, use the real stuff -- pop your own if you have a air popper. ***TT123 Trusty Tip*** Store your popcorn kernels in the freezer (even microwaveable popcorn). Why? It eliminates "old maids" (a/k/a unpopped kernels); and it seems to pop fuller and fresher than if you don't freeze it -- over time the kernels loose moisture. The moisture in the hulls is what helps those kernels pop. If stored in the freezer, that moisture remains longer.
- Fresh popcorn works best -- do NOT use that old popcorn (microwaveable or not) that's been setting for a few months (or more) in the cupboard.
- Do NOT (I repeat) use margarine...use BUTTER. The flavor is better, and less artificial in all respects.
Quick coupon tip
By Rachael:
FYI if you love Cheerios and have a Fareway store near you.
FYI if you love Cheerios and have a Fareway store near you.
This week Fareway has Big G cereal – Cheerios & Wheeties only - on sale 4/$9 and then they have a coupon for $3 off if you buy 4. Making your total $6 for 4 boxes of cereal…
http://www.fareway.com/ftp/ads/Cresco_weekly.pdf
PLUS http://www.coupons.com/ has a coupon for Cheerios by 2 save $1.00 --- you will be buying 4 so you can print two of these coupons!
Which makes your grand total --- $4.00 for 4 boxes of cereal!!!!!!
I don’t think it gets any cheaper than that!!!
I know, I know, that a lot of wheeties or cheerios to have on hand – but there are recipes out there for cereal bars, etc. be frugal & get creative!!
MAN, I LOVE A GOOD DEAL!!
Wednesday, September 26, 2012
Fun Friday Filming
Melody and I will be busy filming a very large project this Friday. Can you guess what we are going to turn this dirty old shelving unit into? The only hint I can give you is, it's going to be fantastic! Give us your best guess and we will give a fun shout-out to the winner on our page.

Tuesday, September 25, 2012
Canvas Art
Review by Lyndee:
Canvas art. They make it sound
so easy online.

Just mod podge some
newspaper, put on stickers, paint over, peel off the stickers and waalah, it’s
art. Er, or not. There are a few things they neglect to tell
you, or that I didn’t carefully enough.
That’s always a possibility too. First of all, make sure the newspaper
mod podge is dry before you move to the next step. I slapped on some mod podge
and minutes later I threw on some paint and peel stencil stickers. I painted over them and went to peel them
off, as it says to do this before the paint dries. So when I went to remove said stickers, it
pulled up the newspaper and left me with chunky canvas goo. Ugh! I’m
pretty sure it used about half of my 20 times that I could reapply said
stickers. This was the main feature of
my canvas but I wasn’t about to stop here.
I repainted over the debacle in white.
I still had the two side bars I had wanted to do words on. I made sure the newspaper mod podge was dry
then tried the stickers again. It worked much smoother this time. But now I had a cool canvas with almost a
border and nothing in the center. Seeing
how our wedding anniversary is fast approaching, I took a picture from our day
and mod podged it on. Hooray! Project saved, I thought. A bit later my impatient self ran my fingers
along the left side. Yep, dry. Then the right side. Crap, not dry! And the letters smeared
down. At this point I knew it was best
to set that one aside and not mess it up any worse.

I took the smaller canvas that I had mod podged a page of a book too. I
decided to add my sticker letters and sponge paint it with a bright
yellow. This turned out pretty neat, up
close. From far away it was hard to read
what it said because of the yellow on white.

So last night I added some shading with a fine tip sharpie and two small
flowers. It’s no Rembrandt but I think
it will be cute in the office or Maia’s room.

Monday, September 24, 2012
Hawkeye Coasters
Review by Lyndee:
I did the Iowa State coasters for my Uncle John last week but I needed to make some Iowa ones too so that it was fair, and because I like the Hawkeyes better. Easy as always. Small tiles, mod podge and slap on some pictures. Mod podge two more coats and you're all set. Can you say, Christmas presents? Oh yes!

I did the Iowa State coasters for my Uncle John last week but I needed to make some Iowa ones too so that it was fair, and because I like the Hawkeyes better. Easy as always. Small tiles, mod podge and slap on some pictures. Mod podge two more coats and you're all set. Can you say, Christmas presents? Oh yes!

Cheesy sticks made out of cauliflower
Review by Lyndee:
I love cheese bread but it doesn’t fit into healthy living by any
means. High carb, high fat, loaded with
cheese is a bad idea, right? So I saw this recipe and thought, even though I don’t
like cauliflower, I’m going to give it a try.
It looked good on paper. What could possibly go wrong? You can do this as one big crust and cut into
strips for breadsticks or use it as a pizza crust, or make individual size
crusts. We went with one biggie.
Ingredients:
2 eggs
2 cups mozzarella cheese
2 cups riced cauliflower (grate the cauliflower on a cheese grater)
2 garlic cloves, minced
1/4 cup fresh julienned basil

Preheat oven to 450 degrees. Line
a cookie sheet with parchment paper, spray with non-stick spray.
In a medium bowl, combine riced cauliflower, basil, eggs and
mozzarella. Note-make sure your cauliflower is dried off! Suck up any excess moisture you can with paper towels before combining the ingredients. Press evenly on the parchment paper. Bake the crusts at 450 degrees
for 13-15 minutes. Remove the cookie sheet from the oven.

Ok, first of all, making riced cauliflower is a pain! I have never cut
up a head of cauliflower before. Don’t
make that face! No one in my house eats it, why would I? I took off the hard middle and leaves, washed
it off and tried breaking off pieces to grate.
I had cauliflower chunks flying everywhere! I decided this would be
better done with a food processor than a grater and manual labor. I was correct. I riced up the equivalent of two cups of
cauliflower, added the eggs, cheese, garlic, some basil and a few dashes of Italian
seasoning. I mushed it together onto
parchment paper and stuck it in the oven for 13 minutes. It was just beginning to turn golden brown,
the kids were starving and the pizza bake was ready so I took it out and sliced
it up. The kids actually ate it. Of course, they had NO idea that it was
cauliflower but they liked it. It was a
little “eggy” for my taste. Next time I would use just one egg and I would
be sure to cook it for the full 15 minutes.

I think using this as a pizza crust would taste much better because you’d
have other flavors involved. Michael
dunked his in his pizza bake and enjoyed it that way. Or do the breadsticks but follow my bolded
suggestion above. If you try it, let me know what you think!
Pizza bake
Review by Lyndee:
I like to think of this pizza bake as the sweet love child of pizza and lasagna. It cost less than $10, fed the entire family (we had plenty of leftovers) and it was super tasty. It takes a little bit of time from start to finish so don’t count on this as a last minute what’s for dinner meal.
Ingredients:
1 bag of Egg Noodles
1 extra large can of spaghetti sauce (I started with a normal jar and had to open a 2nd one)
3-4 cups shredded mozzarella cheese { depending on how cheese your family likes}
1 1/2 lbs hamburger meat or Italian sausage
1 package pepperoni

Preheat the over to 350 degrees. Brown the meat, & drain. In a separate pot, boil noodles until soft. Drain. Once noodles and meat are cooked, spread a thin layer of tomato sauce on the bottom of a 9x13 baking dish. Layer with half the noodles, half the meat, half of the sauce, rest of the noodles, half the cheese, rest of the meat, rest of the sauce, rest of the cheese. Add a layer of pepperoni. Cover with foil and bake for 30 minutes. Take off foil and bake for 15 minutes more or until the cheese turns a bubbly golden brown. Let sit 10-15 minutes before serving.

The kids devoured this! It was great! Even after five of us ate dinner, we still had half a pan of leftovers for the next day. This recipe goes a long way and tastes just as good warmed up later. Super hit that will be on our menu in the future.
For the love of sweet and salty
Review by Lyndee:
The kids love snacks and who can blame them? I do to, especially sweet
and salty ones. Mitchell requested that
we make the “white pretzels” Friday night to take with us camping on
Saturday. I thought it was a great idea,
except they didn’t make it until Saturday afternoon. The kids devoured them by Saturday
morning. Yep, they are that good. They take about 5 minutes to make and 15
minutes to set and it couldn’t be much easier.
Ingredients:
1 bag small pretzel twists
3 squares of chocolate almond bark
3 squares of white almond bark

Melt the first there squares in a microwave safe dish. Pour in pretzels and swirl around with a fork
until covered in the almond bark. Lay on
wax paper to dry. Repeat with the other three bars of almond bark. Bam, you’re done.

Friday, September 21, 2012
College coasters
Review by Lyndee:
I love making the coasters so much that I had to make some more. Although it's painful for me to make Cyclone coasters when I'm a Hawkeye fan, these are for Uncle John's man cave so I sucked it up. I think they turned out pretty well. They will look great on the new bar that Melody and I are going to be making him next week. Rock on.

I love making the coasters so much that I had to make some more. Although it's painful for me to make Cyclone coasters when I'm a Hawkeye fan, these are for Uncle John's man cave so I sucked it up. I think they turned out pretty well. They will look great on the new bar that Melody and I are going to be making him next week. Rock on.

Thursday, September 20, 2012
Catch Some Rays!
By Melody
 I got this idea from Jean at The Artful Parent. She helps me feel like such a creative mom because she's so innovative and resourceful with the projects she comes up with. It's mostly ideas for stuff that I have laying around the house anyway. My daughter has such a artistic side to her as most kids do her age, so I knew this project would be right up her alley.
I saw this idea for homemade suncatchers on Jean's site, and had to try it out. We have tons of these pony beads that the kids make necklaces with. On one such day, my li'l guy accidentally tipped over the organized beads and they were all instantly mixed together. So, I took those mixed beads and began with a creation.
Jean says she put her beads in the oven at 400 degrees for 20 minutes. What seemed to work better for me was 450 degrees for 30 minutes. Apparently, my stove is a wimp! Then, take them out of the oven and let them cook in the pan. Takes about one hour for them to cool. Then, you should be able to just tip them out of the pan. I had to gently pry the suncatchers I baked in glass or nonstick pans. The cheaper the pan, the easier it is removal!
Trendy's Tips...
(http://www.artfulparent.com/2012/06/making-melted-bead-suncatchers.html)
 I got this idea from Jean at The Artful Parent. She helps me feel like such a creative mom because she's so innovative and resourceful with the projects she comes up with. It's mostly ideas for stuff that I have laying around the house anyway. My daughter has such a artistic side to her as most kids do her age, so I knew this project would be right up her alley.
I saw this idea for homemade suncatchers on Jean's site, and had to try it out. We have tons of these pony beads that the kids make necklaces with. On one such day, my li'l guy accidentally tipped over the organized beads and they were all instantly mixed together. So, I took those mixed beads and began with a creation.
Jean says she put her beads in the oven at 400 degrees for 20 minutes. What seemed to work better for me was 450 degrees for 30 minutes. Apparently, my stove is a wimp! Then, take them out of the oven and let them cook in the pan. Takes about one hour for them to cool. Then, you should be able to just tip them out of the pan. I had to gently pry the suncatchers I baked in glass or nonstick pans. The cheaper the pan, the easier it is removal!
Here's my video tutorial...stay tuned for the outtakes at the end -- my house is hectic, but my kids are quite the little hams!
http://animoto.com/play/9zWcbSejEcjZ1N0AEjw58A
Trendy's Tips...
- Use the cheap aluminum tins you can buy at the grocery store. My creations seemed to slip out of them so much easier than using my glass baking dishes or my non-stick baking dishes.
- Dumping a bunch of random beads into the dish seemed to make for prettier suncatchers. The more I tried to make a design or write letters, the more frustrated I became, and the end product wasn't all what I expected -- you can't really control the melting process.
- Cook in a toaster oven outside if you have one. Jean warned me that the house would smell pretty darn potent, and she was right. I don't have a toaster oven, so I had to cook these bad boys in my oven, and the house did smell like a plastic factory for about an hour or so, but the smell didn't stay. And, after lighting a few candles, the house's smell was back to normal (which on some days isn't so much a great thing).
(http://www.artfulparent.com/2012/06/making-melted-bead-suncatchers.html)
Those naughty word brownies
Review by Lyndee:
I’ve been eyeing the recipe for “slutty brownies” the last few weeks online. They look so remarkable it makes my tongue tingle a bit. But I’m smart enough to know that a pan of those in my home would be a disaster for my waistline. I was so excited last night when I went to my friend Molly’s Pampered Chef party and her and the host, Julie, had baked these up for us to try in the pampered chef single brownie pan!

Recipes online say to put down a layer of cookie dough (store bought or homemade). On top of that place a layer or Oreos or Reese’s peanut butter cups. Then you pour brownie batter over the top and bake for a rich ooey gooey treat. Molly opted for the mini Reese’s and did two per square. If you want more peanut butter use the normal size peanut butter cup or you could try Rolo’s too. Bake at 350 for 17 minutes. I didn't get the chance to take pictures of the process but these pictures will give you an idea of what they look like if you use do the Oreo method.


These were just as good as I was expecting. I loved doing it in the pampered chef pan because then you have the crusty outer layer on every piece of brownie but doing them in a 9x13 would be great too. I will definitely be making these for the next potlock or food day at work. Super easy and decadent. A perfect fix for your inner chocolate lover.
Wednesday, September 19, 2012
Recycled Magazine Coaster
Recycled coaster review by guest blogger, Amy Kort - http://muffinsnsuch.com/whats-cookin/
I looked for a simple and fun craft for my neighborhood of women’s get-together I’m hosting in October. My husband and I are into recycled stuff, living green, etc. so I was looking for a craft to help show our interests. So I turned to Pinterest to help me find a suitable craft.
Since we all have dozens of magazines hanging around (well, at least I do), I thought I’d search for something to do with them. I found this article about recycled magazine coasters. http://howaboutorange.blogspot.com/2009/06/recycled-magazine-coasters.html.
I followed the directions carefully – trimming each page, folding and weaving. And weaving is where I got in trouble, so I called upon my husband for help. It wasn’t the “under and over” part of it; it was the connecting and intertwining of it all.


Lesson learned: a video would have helped with this post. Also, the pages need to be trimmed down a lot more than she suggests. My “squares” turned out much bigger than hers.
By the way, I’ve decided this may just be too difficult to show 25 women how to put together. So, I’m looking for any cheap/easy ideas for my Oct. 11 get-together at my place. Post ‘em here, please!
Egg Carton Bats
Review by Rachael:
I can’t believe how fast Halloween is coming and we have no
decorations out! I think this is so cute and easy for the kids to do!

My main focus was on the egg carton bats since we have tons
of cartons laying around for crafting projects. You will need the carton with 3
side by side, not a regular dozen.

Depending on the age of your children you will want to do
the cutting of the egg carton. I found it tricky to make the cuts without
little rips and tears of the carton. Once you have the 3 piece section cut out
you will want to trim the edges a little bit to give them a “bat” look.

So far mine look nothing like the picture online!
The next step in the process is to paint them all black and
then put eyes on them. We could have done it this way but that’s not that fun
or creative to me! Instead we decided we would decorate them anyway we wanted.
They could be scary, pretty, funny, etc. We got out our craft bag full of
markers, stickers & stamps.


They had fun for a little while & then were done with
it. It was hard to cover all of the carton area since it’s so “bumpy”. Jake, my
5 year old, couldn’t get over the fact that his wasn’t exactly like a bat.
Memphis had fun with color & made some awesome bats. This didn't work like I thought it might & next time I
guess I would just paint them black and add the eyes. Just seems a little boring that way. Who knows maybe that will be our next project – covering up
the ones we already did!!

Easy Chicken Enchiladas
Reviewed by Rachael:
Ingredients
1 (8 ounce) package cream cheese
1 cup salsa
2 cups chopped cooked chicken breast meat
1 (15.5 ounce) can pinto beans, drained
6 (6 inch) flour tortillas
2 cups shredded Colby-Jack cheese
Directions
Preheat the oven to 350 degrees F (175 degrees C). Lightly grease a 9x13 inch baking dish.
In a small saucepan over medium heat, combine the cream cheese and salsa. Cook, stirring until melted and well blended. Stir in chicken and pinto beans. Fill tortillas with the mixture, roll and place into the prepared baking dish. Spread cheese over the top. Cover with aluminum foil.
Bake for 30 minutes, or until heated through. Garnish with your favorite toppings such as lettuce and tomatoes, or sour cream.
I found this recipe while looking for a quick & easy meal idea. I don’t mind cooking every night but there are nights where something fast yet filling would be nice. After reading the reviews on this recipe I decided to give it a shot. Although many reviewers had suggestions for making the recipe better; many said it was very rich and that 4 oz. of cream cheese would be enough. I didn’t want to waste any cream cheese so I used the whole 8 oz. package, reduced fat of course. I also saw comments stating that an even easier way to make this was with canned chicken instead of taking the time to cook chicken breasts. I have heard of canned chicken but never have I actually purchased or used it….I was a little skeptical about this part. But hey it would save me time! There were actually several options of canned chicken and you know me, I went with the cheapest one. Also, I am not a fan of pinto beans – so I cut that out of the recipe all together.
I wondered how it could be an enchilada dish without any enchilada sauce?! But then I saw a few reviews stating they add it to their dish. So I purchased that as well.

I started by adding ½ the can of enchilada sauce to the bottom of a greased 9x13 pan (which wasn’t big enough by the way – I used another small glass container as well), preheated the oven at 350 and started melting my salsa & cream cheese on the stove.
I then got distracted by a screaming child in the other room; luckily my husband came home a few minutes later & yelled “what’s burning”. Oops! Luckily he caught it on time and I was able to salvage it.
I drained the chicken and stirred it in the mixture, using two cans, as one didn’t seem like enough.
Fill each tortilla with a portion of the mixture and roll up, place in glass pan. I had enough filling to make 9 enchiladas, so I did. Sprinkle the enchiladas with cheese, cover with foil and bake for 30 minutes. I didn’t feel they were completely warmed through yet so I put mine back in for another 10 minutes.

Overall, they were pretty good; nothing too exciting though. They were fast & easy which is what I was looking for. Next time I may actually add some onion or chilies to the mix to try & spice it up a little bit.
We had no kids at home last night...I know! That never happens!! Sorry, I got excited there for a minute…where was I, oh yes, so I have no idea how kids would react to this dish. Although after tonight I should have an idea as its leftover night! Yippee!! I would say go ahead and give this one a try but don’t be afraid to make it your own!
Tuesday, September 18, 2012
Cajun Alfredo Spaghetti Squash
Review by Lyndee:
I love pasta but in these days of a healthier lifestyle I have to opt
for spaghetti squash over a heaping plate of fettucine. Does that mean I can never have chicken
alfredo again? The thought of that would
be heartbreaking. No, I’m not going to
eat the kind loaded with cream, butter or their evil villain names, high fat
and calories. I decided to make my own
version and see if it could satisfy my inner fat girls craving for something tasty.

Spaghetti squash (cooked and forked into spaghetti)
3 cans 97% fat free chicken breast
¼ cup red pepper
¼ cup yellow pepper
2 green onions
1 jar Classico alfredo light
6 oz plain greek yogurt
1 bag of steamfresh broccoli
½ cup diced tomatoes
¼ baby spinach leaves
1 tbsp crushed red pepper
1 tbsp hot sauce
2 tbsp minced garlic
2 tbsp parmesan
2 tbsp feta cheese
You can remove or add any veggies you like but this is what I went for
in my experiment. While the spaghetti squash is baking and the broccoli is
cooking, add garlic, onions and peppers to a large sauce pan on medium heat for
a few minutes. Add the rest of the
ingredients and let this simmer for about 15 minutes (or until warmed
through). You can add more hot sauce,
pepper, or other seasonings that you desire to taste. I was good with what I had. It turned out super creamy with a perfect
amount of kick (I doubled the hot sauce but most people will probably want less
heat). Once heated thoroughly, place on
a bed of spaghetti squash and enjoy. It’s
that simple and much less fat and calories than you would get at Olive
Garden. The only thing I would change is
that I would cook up some chicken breasts and cube next time, rather than using
the lazy lady canned chicken. It doesn’t
pack quite the juicy flavor of a real chicken breast. If you're not worried about carbs serve it over regular or whole wheat pasta. Spaghetti squash can get a little watery but you wouldn't have that problem with standard pasta.
*Warning: this made a HUGE batch. I did this on purpose so I had my lunch for the week all ready to go.
*Warning: this made a HUGE batch. I did this on purpose so I had my lunch for the week all ready to go.

Coolest coasters
Review by Lyndee:
At Testing Trendy 1, 2, 3 our theory is, you can never have too many
coasters, especially ones that are personalized and made with love. We had found a few boxes of bathroom tiles that
were a perfect 4x4 size in the garage and they were begging to have a face
lift.

I decided to make two sets. The first one I used some pictures from
Rachael’s wedding, stickers and scrapbook paper. Arrange on the tiles as desired, fasten with
some ticky tack glue and mod podge away.
It’s that easy.

I had so much fun
doing it that I had to make another set out of some vintage looking scrapbook paper. We’re calling these the “prague”
coasters.

Word of advice, if you are going
to do pictures, print them on a card stock as normal printer paper is a bit
thin and may bubble up a little bit.
Also, using sharpie to draw on these tiles (the surface was super
smooth) leads to smearing when you mod podge, no matter how dry you think it
is. Next time I will try roughing them
up a bit with some sand paper or sharpie them the day before to ensure they are
dry. Regardless, I think they turned out
pretty cool and I am looking forward to making some more of these in the
future. It’s such a quick and easy gift.
Next I’m thinking some team coasters (Go Hawkeyes!) or Melody’s idea of
newspaper clippings.
Monday, September 17, 2012
Tis The Season…for leaves that is!
Review by Rachael:
I love this time of year!! The weather is starting to get
cooler, leaves are changing colors and starting to fall, football season is
upon us and it’s time for those yummy cold-weather comfort foods. Fall is also a wonderful time to let the kids play and use
their imaginations! I know, I know, it would be much easier to just rake all
the leaves up and compost them. But why not have some fun first!! It’s funny how eager the kids were to rake leaves when they
knew they could play with them. They even borrowed a rake from the neighbor so
they could each have one! They ran out of leaves in the front yard so they started
hauling leaves from the back yard!

The kids decided they wanted a leaf house they could play
in… it’s kind of hard to see in the picture but they had walls and even an
opening for a door so they could get in & out.

It made me smile to watch them with this “project”. I had no
influence on this, they came up with this on their own and it was good to see
them outside, enjoying the nice weather and using their imagination! When it comes to fun, kid friendly things to do in the fall
– the sky’s the limit!
Super cheap wood signs
I wanted to create something fun for the living room that was colorful,
sweet and cheap. I believe I accomplished all of the above with this piece. I
took some scrap wood, spray painted it red and added a decal. The wood was free, the decal cost 97 cents at
Wal-mart and the spray paint was $1.57.
You could do a more neutral color, depending on your décor. My living room is beige with white furniture
and hardwood floors so I went with the red so that it would pop. You wouldn’t want to do too dark of a paint
or the decal won’t show up very well.
This could’ve been a little lighter but I think it still works. And again, not bad for a project under $3
that took about 20 minutes, including time for paint to dry. This was very easy and I think it will be a
great compliment to our living room.

The other project on wood didn’t turn out as well. I took a board and painted it blue. Once that dried I added stickers to spell out
dream, love, believe. I painted over
that with white paint. In my head the
white paint wouldn’t run and the stickers would peel off perfectly. This was not the case in reality. First I tried taking off the stickers when
the white paint was still a little wet.
That was a total debacle.
Then I waited until it dried and tried to take them off but they were a
bit stuck to the board at this point.
This would work okay on a mantle or in a child’s room. I’m saying childs room because people might
think a child made it. Next time I may
try to stencil the words or use a decal instead. It didn’t come out as wonderful as I thought
it would, but for under $2 it’s not a
bad piece.


Cake batter blondies
Review by Lyndee:

Ingredients:
1 box yellow cake mix
1/4 cup canola oil
1 egg, beaten
1/4 – 1/2 cup milk
1/4 cup rainbow sprinkles
1/2 cup white chocolate chips

Preheat oven to 350 degrees. Combine the cake mix and sprinkles in a
large bowl, then mix in the oil and egg. Add the milk slowly just until the
batter is combined – you want it to remain as dense as possible. Stir in white chocolate chips. Place better in
a greased 8×8 pan or 8-inch cake pan. Bake
for 25-30 minutes or just until the edges turn golden. Let cool for 20 minutes before cutting because
the gooey center needs to set.

If you like cake batter, you will love these bars. They are a perfect cross between cookie and
cake. Moist, sweet and yummy. They were easy to make and cheap too. Please
note that it doesn’t make a very big batch.
If you want a full 9 x13 pan to take to share, I would double the
recipe.
Fall vase centerpiece
Review by Rachael:
While leaving work on Friday I was observing all the long
blades of grass by the fence line and the various weeds growing by the water
way and I got an idea for the kids.
I picked up the kids & brought them back with me to
decide which items they wanted to use for a fall vase centerpiece. They thought
I was weird at first telling them my idea, but they were game for trying it
out. Once we started looking at all the different weeds/grass we had to work
with they got more excited!
Here is all you will need… a vase (size depending on the
room you have in your house) and a little bit of nature (weeds, grass, rocks, etc)

We decided it would be cool to put leaves as filler in the
vase. As we started putting whole leaves in one accidentally got crushed
up…which looked even better! The kids started grabbing leaves from the ground
around them and crushing them up.


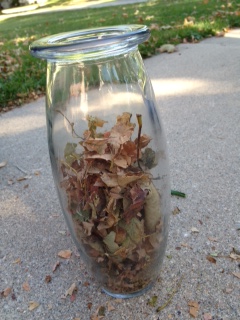
Once we had enough leaves crushed we moved on to the taller
items. The perfect thing about this project is that they were able to put the
sticks/grass in how ever they wanted and it was going to look great. They could
be as creative as they wanted and they loved it.

This is good for most age groups, they can be creative, use
their hands and it can take as little or long as they want.
Here is our final project! I was so proud of them – it looks
awesome!!

Subscribe to:
Posts (Atom)